So, I finally released my first Minecraft: Education Edition map on the education.minecraft.net website a week or two ago and I have been 'brewing' a reflective post on the lesson plan and the world in the light of my last two posts. Essentially in this post, I am going to break down the world and the teacher lesson plan and try to explain the reasoning behind each section and how I think it 'best' supports teachers to pick up my lesson and run it, regardless of their experience level. The direct link to the lesson is:
https://education.minecraft.net/lessons/exploring-contour-maps
So let's start with the world. Each of the below are 'screenshots' of particular key sections or components of the world that I think support teachers to run this lesson. If you would like to download the world and have a look, you will need a M:EE account of course, but if you have that, feel free to grab the world and have a look here:
http://bit.ly/EduelfieContours If you don't have an EE account, feel free to reach out in the comments below or on Twitter @EduElfie, as I may be able to give you a non-EE, Bedrock or even possibly a Java version to explore, but of course you wont have the border blocks, or the NPCs.
An overview of the world. It is not as 'neat' as I would like it to be on the sides, but that is because I converted this over from an old MinecraftEdu world. Each section is surrounded in border blocks to prevent students crossing into areas that they are not supposed to go into. I have also put visual cues in for both the students and teachers to refer to for each of the 3 groups.
The 'tutorial' mound. This supports both teachers and students to 'see' what the task involves before being 'unleashed' onto the main task(s). There is a 'tutorial' section for both activity 1 (shown) and activity 2.
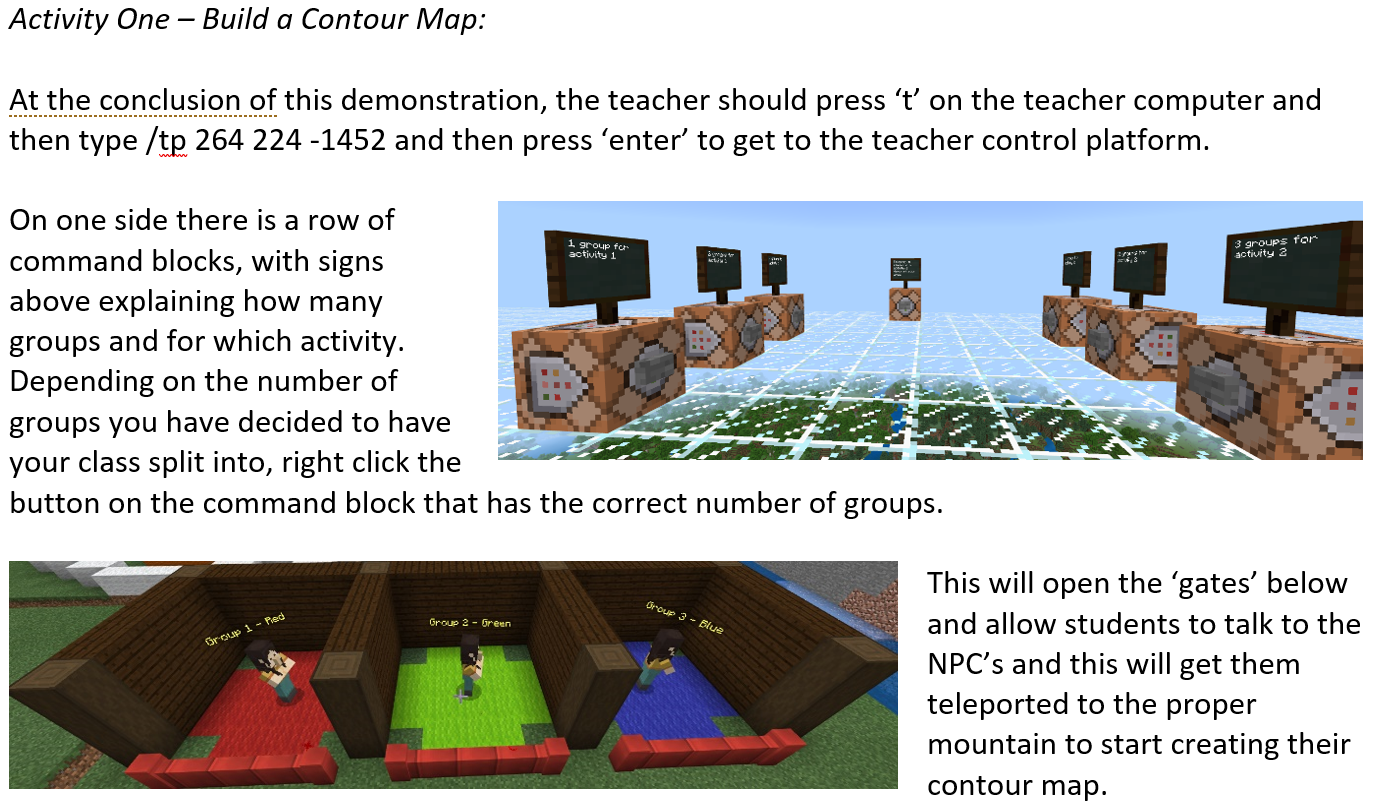
The grouping section. In the lesson plan, I have suggested that teachers can have up to 3 groups, and the colours associated with them. These border blocks are removed by a command block that the teacher hits when they are ready for students to start the first main task of the lesson. I think that is a key component, students are natively curious, and will head over to the NPCs and chat to them, and possibly miss the opportunity to complete the tutorial section. Students cannot interact with the NPC's while the border blocks are there. Each NPC is programmed to tell students what group they are part of and then teleport any player standing on the coloured carpet to the appropriate group location. There is one of these for both activity 1 and activity 2.

The teacher control panel. At the click of a button, with the appropriate instructions in the lesson plan, the teacher can choose the number of groups for activity 1, teleport all students to the tutorial area for activity 2, or choose the number of groups for activity 2. Teachers have the explicit /tp x y z command in the instructions to make it easier and quicker to get to this location.
So that probably wraps up the key parts of the map. Are there things that I could improve and make it easier for teachers to manage? Possibly, but I think each has enough 'cons' vs the 'pros' that I think it is as easy as I can make it currently. One concern is that once a student teleports to their 'mountain' there is no way back. This could be problematic if a student is standing on the wrong coloured carpet and someone else talks to the NPC, but there is no simple solution for this. My only 'easy' fix would be for the teacher to use either classroom mode, or explicit /tp commands to move students to the appropriate group, or put up with the change in circumstances.
Other options to resolve this would be to do a 'one at a time' teleport system, or to border block the NPC in a different way, and get the teacher to tell students to stand on the colour that signifies their group, and then hit the button to remove the border blocks, or finally set an 'automatic' teleport based on what block students are standing on once the teacher has 'opened' the option to teleport. All of these options are viable, but, in my opinion, not quite as straight forward for a teacher to use in a classroom.
Secondly, if the teacher decides to have multiple groups, and one group finishes activity 1 first, there is no easy way of getting just that group to the tutorial for activity 2, or all students to the tutorial activity 2 and those who haven't finished 'back' to activity 1 once the tutorial is completed. This is even trickier than the first problem, and I think my only solution would come from having access to scoreboards in M:EE, which will hopefully happen soon given tweets about scoreboards coming to Bedrock! It would essentially allow the teacher to 'tag' particular groups as having completed activity 1, and then teleporting based on that information. This would also mean a 'redesign' of the grouping mechanic and tagging students with their group colour as a piece of data as well, but all theoretically doable with scoreboards.
Actually, this thought process has given me a solution that would work right now. I was recently using xp levels as a mode of 'recognising' particular students, and in theory, I could re-set this map up to use that mechanic to signify what group students are in, and whether they have completed activity 1... hmmmmm.... possibly a job for a future Elfie, if he ever gets the time to revisit it before scoreboards!
Now to the lesson plan itself. I am going to screenshot sections of the document, as I did the map, and outline why I think these sections are valuable for teachers, but if you want the whole document itself, you can download that from:
http://bit.ly/EduelfieContourLP
I think this one speaks for itself, the target age group, and the links to curriculum. As mentioned in the previous post(s), these are in my local curriculum 'speak' and I would expect teachers from other states/countries to be able to 'convert' these to their own standards, although adding in the ages I think is something that supports globally.
While these "Learning Intentions" and "Success Criteria" headings are possibly local language here, essentially they are learning goals, and how students will know that they have been successful at meeting the learning goals. These can be used to explain to students what the task is, and how they will know if they have successfully completed the task. They are also very useful to explain to the teacher what to expect from their students through this activity.
I really like the idea of explaining clearly what it is the teacher needs to do before the lesson to prepare for the actual lesson. Running almost any Minecraft lesson is not a pick up an go kind of deal, there is preparation that needs to be done before hand. Be that learning the appropriate steps, or printing resources ready for the students to use during the class.
The introduction to students. I am not sure I 'nailed' this, and would be interested in feedback. I think being able to clearly explain to students what the task is, and what they will be doing is a key to any successful lesson, be it in Minecraft or not. I also think the explanation here has enough for any teacher to step up and explain to students the task that they will be completing in this lesson, be they 'geography' trained or not.
Step by step instructions for each activity. This is for the introductory/demonstration task. There is a sub section in the document for each task in the lesson. This particular one outlines exactly what to expect when students join the world, and explains what the task is in this location.
This is the start of explanation for activity 1, including the, hopefully clear, instructions for the teacher to get to the 'Teacher Control Platform" and what options are available for them there and how to 'implement' these changes. This section also explains what impact these selections will have on the world, and the students so that there is minimal surprise, and the teacher can also outline to the students what they can expect at each stage.
Skipping over a few sections to the instructions for activity 2. I have included (in activity 1 as well) suggested opportunities for the teacher to request that students gather evidence of their progress, work or learning as well as possible discussion points to take the students learning out of the game, and into the real world. Again supporting teachers to be able to clearly explain what it is they want students to 'produce' as evidence of their learning.

I think all of these sections are important, otherwise they wouldn't be in the document to begin with, but this is possibly one of the most important sections in the whole document. The review section provides suggestions and pointers for the teacher to be able to 'sum up' the learning that students did, and ensure that the learning they expected to happen through completing the task did in fact happen. I think one of the most important things we can do as teachers, in any lesson, but particularly when we are using games in the classroom, is make sure that students know that they actually learnt something. Not only that, but make sure that they are able to actually explain what it is they learnt in such a way that anyone listening can understand what happened.

This is the final section in the document, and is there to make sure that the teacher has a clear indication of the evidence they could collect from students about their learning. Whether these are collected and placed in a 'real world' portfolio of learning by students, or just 'sighted' by the teacher to ensure that the teacher is comfortable reporting that the student met this particular curriculum outcome.
I also really think the 'incidental' learning section is a nice touch, as it explains to teachers that it is not all about the 'curriculum', but that by completing this task students learnt things (possibly) about Minecraft: EE, in terms of the game itself, or the camera/portfolio, but more importantly that last point about Collaboration/Communication. While creating resources recently I have spent a lot of time going through our local curriculum documentation, and there are so many 'outcomes' that could be listed for any collaborative activity in Minecraft.
I have deliberately chosen not to list them all, in the interest of keeping the focus on the specific learning outcomes for this task, however I think it is important to call attention to the fact that there is a lot more learning going on any time something is collaborative. In our system over here, we have 4 'capabilities' which are supposed to be taught across all subject areas, and I think Minecraft is a great platform for actually being able to assess, and report on, many of these capabilities.
Alright, that is one very, very, very long post. If you made it all the way to the bottom, I thank you sincerely for sticking with me through it all. I also hope that by breaking down the world, and lesson plan that I have helped explain my thought process, and why I think these sorts of detailed lesson plans are important in supporting teachers new and old to run lessons that they have not designed in Minecraft.
I also hope it has helped you think about your own lessons, be they in Minecraft or not, and how you may be able to better share your thinking and reasoning when providing support to others around these lessons you have run in the past. As always, feel free to drop any comments or feedback below.