This post it more of a set of instructions for others to follow if they want to pursue this. Think of it as a guide, not a set of rules, but what I have found works.
There is an inbuilt way of getting 3D data out of Minecraft: Education Edition with structure blocks, and these work great, if the builds are smaller than 32 blocks cubed. This process is quite convoluted (and I don't fully understand it yet) however, because of the size restrictions on the structure block export, I choose to use a different method, and while it unfortunately still requires access to a windows machine to work it does provide unlimited sized exports for 3D printing. I am yet to find a mac/iPad workaround, but I continue to search and will update accordingly, or likely write a whole new guide if I manage to find it!
The first step is to have something built, I am not going to provide any guidelines here, go build something you want to 3D print, or grab a world that a student has built in and use that. Either way, you need to export the world from M:EE. To do this click the 'pencil' beside the world name BEFORE you enter it. Scroll all the way to the bottom and there is an 'Export World' button.
Export the world somewhere useful, it defaults to documents normally on a Windows machine. Now browse to the exported file and rename it to .zip instead of .mcworld and extract the files. If you cannot see the file extensions, in the 'View' tab of Windows Explorer there is a 'File name extensions' tick box. Tick it, and you should then see the .mcworld file extension and be able to rename it to .zip.


There is an inbuilt way of getting 3D data out of Minecraft: Education Edition with structure blocks, and these work great, if the builds are smaller than 32 blocks cubed. This process is quite convoluted (and I don't fully understand it yet) however, because of the size restrictions on the structure block export, I choose to use a different method, and while it unfortunately still requires access to a windows machine to work it does provide unlimited sized exports for 3D printing. I am yet to find a mac/iPad workaround, but I continue to search and will update accordingly, or likely write a whole new guide if I manage to find it!
The first step is to have something built, I am not going to provide any guidelines here, go build something you want to 3D print, or grab a world that a student has built in and use that. Either way, you need to export the world from M:EE. To do this click the 'pencil'
 beside the world name BEFORE you enter it. Scroll all the way to the bottom and there is an 'Export World' button.
Export the world somewhere useful, it defaults to documents normally on a Windows machine. Now browse to the exported file and rename it to .zip instead of .mcworld and extract the files. If you cannot see the file extensions, in the 'View' tab of Windows Explorer there is a 'File name extensions' tick box. Tick it, and you should then see the .mcworld file extension and be able to rename it to .zip.
Once you have the files extracted, you are now needing to use the first new piece of software, an external Minecraft map editor called MCEdit. Only you cannot use just any version, you need a special one to open M:EE worlds, and I recommend this particular one here: https://github.com/Podshot/MCEdit-Unified-Preview/releases/tag/MCEdit-Unified-1.6.0.52-testing
While it says it is a 'Preview' release, I have been using it for a while, and it is pretty stable. There is a release after this, 1.6.0.53, but it 'breaks NPCs' in any map opened in it. So I recommend not updating to that version, and sticking with this one. Download the release, unzip the files and run MCEdit.exe and it should look something like this:

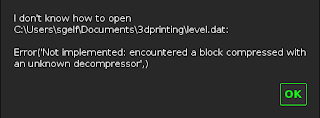
Click on 'Open...' and browse to the extracted files from your exported world from before and choose the level.dat and then click open. If you get this error:
I believe it is linked in some way to the 'Blocks of Grass' template exporting in an 'odd way' and I haven't figured out the fix yet. However, all is not lost, you just need to head back to Minecraft:EE and make a copy of the world, using the 'Copy World' button, and then export that copy instead. That has worked for me most of the time. If that also fails, reach out on Twitter @EduElfie, or join the mentor Discord https://dicord.gg/7fSQBdx and ask in there, and we will see if we can resolve the issue properly.
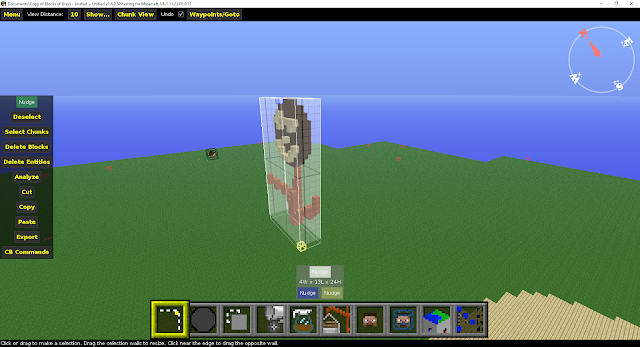
Hopefully once the world is open, it should look something like this:

OK, so your build might be a little more epic than my terrible, winking flower, but you get what I mean. Right?
Now for a little tutorial on moving around and navigating MCEdit. It is similar but also starkly different than Minecraft controls. WASD Space and Shift, still do similar things, but the mouse behaves completely different. Basically, the way I navigate is to hold down right click on the mouse, and that allows 'free' movement of the camera with the mouse, while moving around with WASD Space and Shift. Take a few minutes to try and have a go, and explore the movement, it is quite a jarring experience when it looks like Minecraft, but doesn't behave as Minecraft should! Once you are comfortable moving around, it is time to start selecting things.
To select something, it is a matter of getting your frame of view somewhere reasonable and left clicking on a block, and then left clicking another block to select a 3D rectangular prism. This was my first selection.

You can see that the entire flower is not within that selection area, and that is fine, we can 'pull' faces out to make sure we have everything selected. Below follows a 'snapshot' of each expansion I chose, and the frame of view I did it from. To expand the selection, hover your mouse over a face until the border of the face goes orange, then 'drag' it the direction you want it to be.

You can see in the image above, that I have moved my camera to be more side on, and pulled the front face out a bit so that it gets the face of the flower, instead of just the dark brown 'petals' of the flower. But you can see I am still missing a part of the 'orange wood' closest to my camera.

From this perspective, I now have everything selected, so time to move my camera (don't accidentally left click, it will undo your selection!).

Moving my perspective around to the back of the build, you can see that I am missing the back part of the stem, and also the top part of the petals. Time to pull both the back and top faces of my selection so that I cover all of them.

Done! Now to check all sides again, just to make sure it is all within the selection box.

And it is, so now it is time to take this out of Minecraft and into something another program can read easily. Click the 'Copy' button on the left 'menu pane' and it will 'put' this copy in the top right corner of the screen.

You will notice a little 'Save' button up there, click that to save the copy as a .schematic file. Save it somewhere relevant, it defaults to /Documents/MCEdit/Schematics.
Now it is time to install the third, and final piece of software to make this process complete. This program reads Java Minecraft worlds, or .schematic files and can convert them to stl's for 3D printing. Mineways is a gem of a program, and entirely free, download it from here: http://www.realtimerendering.com/erich/minecraft/public/mineways/
When I open Mineways I get a whole heap of error codes, I believe this is because it is looking at my Java Minecraft saves, and it cannot open them because they are 'too new' a version of Minecraft. I hit 'OK' on all those errors until I come to this screen.

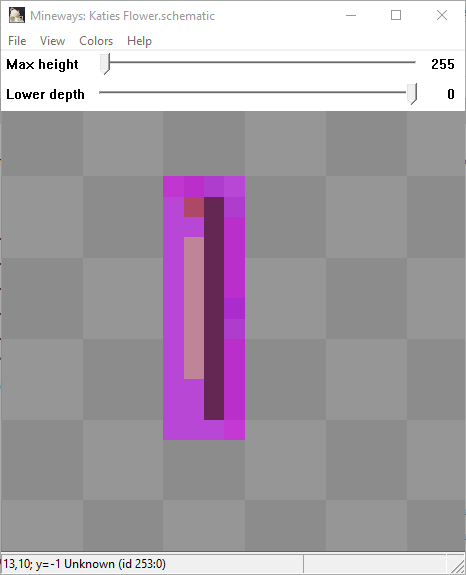
Now it is time to open our schematic file. Click on 'File' and then 'Open' (not 'Open World'), browse to your schematic that you saved before and press open. Because my build is so small, this is what it looks like on my screen.

Zoom in with the scroll wheel, pan by holding left click and dragging. My build is now centered in my viewing area. I should take the opportunity here to say that you don't have to export the entire schematic in the one stl file. You can get all students to build in the one area in the one world and export that entire area as a schematic, and then choose individual builds at this point for individual printing.

Now you need to select what you want to export for 3D printing. Right click and drag to select, it goes bright pink to show you where your selection is.
At this stage you can choose not to export all the way down or up from your schematic using the sliders at the top of the screen and changing the lower and upper bounds of the selection, but in this case, my schematic is only what I want to print anyway, so I can just press 'File', 'Export for 3D Printing'.

This brings up a 'where' dialogue box, so give your stl file a name, choose where you want to save it and MAKE SURE to change the save as type to a stl variety.

I use ASCII text STL, but I was told " The other two binary STL file formats should also work, and are much more compact for transferring the data, so you may want to try them out instead." a while ago, but old dogs... new tricks.... you know rigt? You, however, may want to try the three different varieties (or any of the other file types if you want to delve into other uses) and see which works best for you. Once you hit save, a very, very scary window should appear.

While it looks scary, there is not a lot here that you need to mess about with, there are some key settings that you need to know about, but most can be left as they are. The three things to pay closest attention to are the 'Scale' in the top right corner of the window, The 'Delete floating objects' tick box in the middle of the right column, and the 'Weld all shared edges' tick box on the very right side of the window, again roughly in the middle.
Scale, you have a couple of options, you can either make the whole model a particular height, or make each block a particular physical dimension. Either works, and it is entirely at your discretion which you choose.
"Delete floating objects" - On export you'll be warned if there are "floating bits" such as disconnected tree leaves cut off by the volume selected. On by default, this option will get rid of these floating bits in the volume you're exporting. Turn it off if you're sure you want to export everything in your selection volume.
"Weld all shared edges" - Mineways will automatically add a block here and there if it sees parts that would be disconnected otherwise. However, by default it adds as few blocks as needed. Turning this option on ensures that all blocks that touch at only their edges will have additional blocks added to keep these blocks glued together. This makes the model stronger, but can change its look.
Once you have your setting correct hit that 'OK' button to save your stl file and then open that stl file in your 3D printing software. Hit print and enjoy your work!

That pretty much sums up all the steps. If you would rather see me blunder through this in a video, there is a tutorial video available here that steps through it all, however I need to update the links in the video description, as I haven't done that as of posting this guide:
I hope you found this useful, if you need any more support, or anything doesn't make sense, please let me know in the comments below, via Twitter @EduElfie or on the mentor Discord https://dicord.gg/7fSQBdx Thanks for reading, and happy printing!!