Wednesday 10 July 2019

Teaching Goals vs Personal Goals

In my previous post, after weeks of trying to get something to work, I engaged in some critical reflection, and in sharing that post with some colleagues around the world, summarising the main points of that post, led myself to the idea that I had 'disconnected' from the learning goals and was instead pursuing my personal achievement goals in that project.

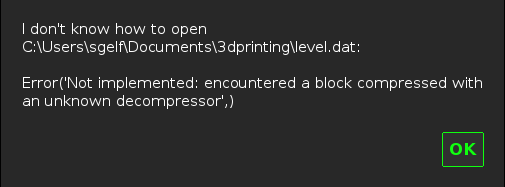
I wanted to map a complete genetic inheritance pattern in Minecraft, and use that to support the teaching of genetics to students. However, when I ran into technical difficulties that prevented me from achieving my personal goal, I stopped to think about the learning goals, and realised that I had focused too hard on my own desires, rather than the needs of the learning goals.

Which really intrigued me, as someone who has always tried to focus on the practicalities required for the teaching and learning I want in Minecraft, rather than the fun, or the pretty, it is quite jarring to realise that I had lost that focus on the learning requirements, but had instead pursued a personal technical challenge. Which, in itself is fine in my current circumstance, as a volunteer, creating this for my own fun, and to develop my own technical knowledge on this new aspect of Minecraft, but....

When isn't it OK, when is it inappropriate? A very quick reflection says that if what I was doing impacted on student learning, or if I was letting students do the same. Letting someone in my classroom, myself, or my students, in class time, when we are supposed to be reaching our learning targets, get bogged down into these kinds of 'rabbit holes' of personal goals that have become disconnected from the learning goals is when.

So, if I had managed to achieve my goal of a complete inheritance pattern mapped in Minecraft, and that was used by teachers and because of the complexities involved, and the possibilities for confusion due to my work were as likely as I think they could have been, that would have been a very disappointing outcome for me, the teachers, and most importantly for the students.

So, I am certainly very glad I realised this now, relatively early on in the project development, but still am a little disappointed in myself. I also wonder what I would have done if I had been able to achieve it (and I am probably still going to try 'on the side) and had been trying to map my lessons to it.

It is really odd, I had already decided I would have 'specific' flies in place for students to perform breeding tests on, and I was going to genetically 'choose' these flies (or adjust them in external editors) so they would have only had a small chance to have alterations to my desired outcomes, but even with those thoughts floating around in my head, I still hadn't the wherewithal to pull myself up and refocus on what I needed, rather than what I wanted.

Having multiple entities will actually make this world and lesson(s) so much easier for me to create and have finished and ready as a learning task for the pending Minecraft: EE update. Now I just have to find the time, and desire to do this 'version' so that I can release it into the wild! Thanks, as always for reading, feel free to leave a comment below.

Monday 8 July 2019

Genetics Development - Day 7 - Genes to Family, Family to Variants than Variants to Game

This was my brilliant plan to fix the fly rendering in Minecraft from where we left it in day 6. I am essentially trying to assign the fly, upon birth, or spawn, a 'family' for each trait they have, and then use the family data each has to explicitly assign the variant and mark_variant flags that allow Minecraft to render the correct model and texture.

Only thing wrong with my brilliant plan, it doesn't work... yet... I can feel the solution is very close, there is something wrong in the way I have coded it causing it not to work, I am pretty sure the theory is correct. However I am stuck in a 'loop' of the genetics assigning only one 'birth event' and that birth event is the sex. Which assigns the correct family (which is nowhere 'in' the entity in external editors that I can find) and it gets the first layer of component groups, but this will not translate across into the second layer, and assign the variant and mark variant as expected.

I have spent a few hours looking carefully at the data the flies have in-game, and what I expect them to have, and it just doesn't align for some reason. So, I am going to try swapping the 'is family' test point for 'has component' and see if that changes things. If it doesn't work, it is because Minecraft doesn't support this 'double dip' through data and I will need to go back to the drawing board and test one of the other solutions from the previous post.

(some weeks later)

After swapping the 'is family' test for 'has component' there is no difference, however, what is interesting is the flies always get their sex component added, but never the other traits. I feel like I am very close, because it does seem to loop the data I want in, for only half of it, so now to try and work out why!!!

After a few (more) weeks of trying to nut this out, I am pretty sure I cannot get Minecraft to 'collate' multiple 'chromosomes' into the one birth event. At least I think that is the issue. It appears that it works in 'sequence' until it finds a birth event whose requirements are met, and then it stops looking at the other genetics.

It is really quite odd, because the entities 'get' the right chromosomes/genetics/alleles applied to them, but only get the 'tag' of the first birth event. Which means I can then not 'give them other tags' and render them appropriately based on their different genetics.

So, this leads me to be thinking about what it is I actually want to achieve. While having a completely mapped genetic inheritance pattern on the one entity is a really, really cool 'technical challenge' for me, is it really required to do the educational activities I want to do?

The simple answer is, no it certainly is not. If I can have as many custom entities as I want, then I can have different entities for each genetic trait we want to explore. This is 'normal' operating procedure in labs all over the world, they know exactly what genotype their breedstock is, and use the appropriate ones for the testing they want to do.

So why should I make Minecraft the exception? I am thinking that I should have multiple different 'fly types' and set up specific inheritance tests for students to explore. Again, this is normal, and supports students in understanding the inheritance pattern we want them to grasp, without causing undue confusion with multiple inheritance patterns impacting on the results. If we can give students specific genetic traits to explore, and interpret, then I am most certainly achieving the educational goals of this project, if not my own, possibly silly, technical goal of having a (mostly) 'true to life' genetic inheritance pattern all in the one entity.

So, there you have it, I have been mulling over this for ages, and thank you for your patience while I have been absent. I will have more to share on the 'why' I have been a bit quieter of late soon, but know that I am still here, working in the background. Thanks, as always, for reading, and if you have any comments, please feel free to leave them below or touch base on twitter @EduElfie.

Thursday 27 June 2019

Genetics Development - Day 6 - Adding to the Genetics and Breaking IT ALL!

So, after ending Day 5 with the basics of inheritance of both sex, and wing type figured out, the models displaying correctly and everything working exactly as I would like, it is now time to try and expand it to include a 'sex-linked' inheritance pattern, white eyes.

Of course, doing this breaks EVERYTHING!!! OK, well not everything, but the basic premise of the whole system I have in place is now untenable. I believe this is because I have the sex type calling a particular geometry by using 'minecraft:variant', and wing type calling a particular texture by using 'minecraft:mark_variant', which leaves me no way to call another texture 'automatically' through this entity.

I can get the white eyes to appear on the fly through external editing, and the inheritance appears to work find on the genotypes of the offspring, but I cannot get it to display the correct phenotype, because it gets 'normal wings' texture before it gets the 'white eyes' texture. Basically it get's a 'mark_variant' for normal wings, because that is what it has, and that doesn't then get overwritten by the white eyes 'mark_variant'.

Now I have figured out the issue, what is the resolution? After quite a few hours fiddling around and trying to understand, I think I need to, somehow, give particular variants, and mark_variants based on the multiple separate genes I have. Each gene marks a 'birth_event' which I then use to add component groups to the flies, which in the past was assigning the variants and mark_variant data.

The first step I have taken is to make all 'geometry' alterations, so that is sex, and vestigial wing type (and later curly wings too) based on variant, and all textures based on mark_variant. This means quite a bit of explicitness in the entity definition and a whole heap of individual textures for each possible phenotype, which I was trying to avoid in some respects, but looks like the entity definition file in the behaviour pack is going to be as large as it needs to be!

Next steps? I have quite a a few options to explore for day 7 and beyond, and they are as follows;

  • Use scripts and custom variables to control and assign the appropriate data to the flies.
  • Use family tags at birth, to then assign the specific variant and mark variants.
  • Use 'materials' as the third 'data change' in the render controller.
  • Use a 'villager' style system to assign different geometries and textures as they assign different professions in the vanilla game.
  • Use 'masked' textures (again as they do in villagers) to 'overlay' multiple parts of the flies.
I think the most likely option for me to initially explore is the 'materials' method, and making the eyes a 'material' that I can alter based on genetics. Second to that will likely be a combination of the masked textures and the villager professions.

There are of course pros and cons in each, and in reality what I want to do may be more readily accessible in the API, so when I have some brain power, I am going to head down the path of exploring that, but I am also really enjoying exploring and I am learning a lot about how entities work in Minecraft, which I am thinking will be beneficial in a lot of future projects too.

But, that is where I finish day 6, a little further along, but also taking a significant step backwards. One thing that has crossed my mind, is to completely separate the different inheritance patterns, and realistically that would work quite well, as in have a "drosophila v" for vestigial, and "drosophila we" for white eyes, which would definitely work, but I am interested in seeing whether I can combine multiple inheritance patterns and weave them into some semblance of correct genetics for this organism.

Monday 24 June 2019

Genetics Development - Day 5 - Testing the Genetics

Testing! Testing! Testing was the goal here. The main aim was to check whether the inheritance pattern of both sex and wing type were correct. I tested 160 offspring from the same parents (after confirming the parents genotypes using external editors) and the results were pretty amazing.

I nailed the wing type inheritance pattern, with an expected ratio of 3 normal : 1 vestigial coming out at 3.21 normal : 1 vestigial.

However the sex inheritance was out, with double the amount of females coming out than males. It should have been 50/50 but was more like 66/34. So this meant some exploring of the genetics of the flies to try and work out why. It took me an hour or so to figure it out, but essentially I had 3/4 of the alleles in the population as female, and only 1/4 male and was only looking at 'one' allele to determine sex.

So my parents were XX and XY (as expected) however I had it set to test only the 'main_allele' and thought that would make it 50/50, however for that to be the case the male would need to essentially be YY, which is so incorrect I could not have it! So, back to the drawing board, to try and work out exactly how these patterns are read by Minecraft.

I ended up doing what I 'should' have done from the start, and females are those with 'both_alleles' as X and males 'either_allele' as Y. This of course creates an issue if you breed two males together (which I still haven't figured a way to prevent) and get a YY... I actually don't know what Minecraft is going to do in this case, but figure, for the purposes of the lessons in and around this, it doesn't really matter.

So, now that I have both the sex, and the vestigial wing inheritance patterns correctly working it is time to try and throw more patterns into the mix, specifically the sex linked inheritance pattern of white eyes. A job for day 6!

Thanks as always for reading! Feel free to leave a comment below.


Thursday 20 June 2019

Is Minecraft Only a Creative Solution for Schools?

This has been on my mind more and more lately as I see the global social media and feeds on what is happening in schools around the world. Admittedly, I am only seeing those using the #MinecraftEdu or @PlayCraftLearn tags and mostly on Twitter, but it is more and more 'only' about students creating to demonstrate learning.

Which I am not suggesting by any means is necessarily a bad thing, but what happened to the teaching lessons, those things we used to have where learning goals were embedded in the game? It seems that the vast majority of uses out there at the moment are students creating something as a demonstration of learning.

So I began to wonder, what happened? When did Minecraft only become a creativity platform for schools, and I think it is since Microsoft took the helm. I also think it has a great deal to do with the 'surface' level of understanding of "Minecraft the game" that trainers, and therefore those they have trained have. The number of users with access to M:EE continues to grow as more and more districts, regions and states (however it is broken up in your area of the globe) begin to license it, and as such there is a high level of 'inexperienced' Minecraft educators out there, who are looking for support. Microsoft holds the training, and uses their trainers, and while those trainers are great at getting people 'on board' and understanding what Minecraft is, and how it can be used at this base level, there is not enough knowledge out there in the majority of trainers about "Minecraft the game" to help people go beyond this low level usage.

I look back at the maps available 6 years ago, before Microsoft took MinecraftEdu off the shelves, and the 'hallmark' map and learning activity was really Eric Walker's World of Humanities. It was an immersive world that took students through masses of learning content, involved gameplay, quests, information and really used the best of what Minecraft has to offer for educational purposes. I would link you to the original page for that, but that is yet another thing that Microsoft have recently pulled off the shelves, and despite multiple community requests, and myself asking repeatedly for further information, we still have no visibility on the reasoning of that decision, or whether they will ever be made available again. That grump aside, here is an archived copy of the page with an outline of the world: https://web.archive.org/web/20160319171629/http://services.minecraftedu.com/wiki/Wonderful_World_of_Humanities

Second to that was probably Joel Levin's Escape from Everest map. One which I have been 'in the process' of updating to work with EE for about 12 months now, at the request of a community member, and sadly I just have not had the time to get that project over the line. I cannot get you an archived link to that one unfortunately, as I have been unable to access the old world library pages at all.

Of course I rank most of my original maps up there as 'learning tasks' in Minecraft, but they are also available for M:EE right now. Alongside mine, there were Shane Asselstine's maps where the tasks were always gameplay based, but tied tightly to learning outcomes, and many other user generated maps as well, all of very high quality, and using Minecraft explicitly for educational outcomes, not as a creativity tool alone.

I think the main difference between back then and now, which is by no means a fault of anyone, even though this post seems directed at Microsoft and their trainers by what you have read thus far, but back then, those integrating Minecraft into their classrooms knew the game, today to put it simply, the majority of teachers using this platform don't know "Minecraft the game" at all. What they do know is that it is loved by kids, and that they can join students together in multiplayer sessions, and that kids can create in it, but they know nothing about the gameplay, the mechanics, which of course means they cannot map learning into worlds or tasks beyond allowing students to be creative in this space. Alongside that, the majority don't have the time (or possibly the desire) to go and play, which is one key stepping stone to going beyond the basics in any learning tool, making the time to explore deeply to better be able to incorporate into lessons.

This is limiting the growth of learning tasks in Minecraft hugely in my opinion. Giving students the opportunity to demonstrate their learning of a topic in Minecraft is low hanging fruit, and while the end product may be far more interesting than writing an essay, or drawing a picture, is it really any different? I don't often 'call down' the SAMR model, but in this case it is quite literally using Minecraft as a substitute for a pencil and some paper, or perhaps a replacement for LEGO or making a diorama or poster.

Now look at the lessons that used to be available. Fully immersive worlds, with learning embedded throughout in gameful tasks. That is a redefinition of how education works, and that is the power that Minecraft CAN have in classrooms. It CAN go fluidly across all the different 'levels' of SAMR. However currently the larger community is stuck at only the basest understanding of this power and as such there are millions of students using Minecraft as a pen and paper creative tool, rather than an immersive learning environment.

So, what can we do to fix it? Well, here goes a bit more of a rant, I have been trying for years to get Microsoft and more specifically the M:EE team to see that the 'Mentor' community is not actually mentoring, a large portion of the members in that community in the past have been new to Minecraft. There is a greater portion of people within that community now that have game knowledge, but it is not enough of a ratio to tip the community over the edge. The community is a community of people from all over the globe, with knowledge ranging from absolute base understanding (or lower) through to very high level understanding about gameplay, and how to manipulate it to create immersive learning experiences.

All of that 'beyond the basics' knowledge is 'wasted' within that community. Sometimes I feel that Microsoft has misnamed the community, they don't seem interested in driving or supporting pedagogical discussions in that space or in community members discussing things and building lessons and worlds together, but are very interested in the community amplifying the message that Minecraft is good in classrooms for students. Which, it is, but there is so much more a true 'Mentor' community could do. Spreading the word is only part of mentoring, and in my mind is more of an ambassadorial type role. I think, in the end, until Microsoft and the M:EE team begin to value immersive lessons and starts producing content or challenges, or even supporting the production of resources, that go beyond the paper and pen substitute level, then we, as a broader community are stuck, and here is why.

I was told, when someone from the M:EE team saw Mini Melbourne a few months before release, that they didn't want students just exploring, which of course, in this case has massive inherent value for rural students and planning of trips. I also have some in-depth lessons available with many more planned, but to hear that from someone on the team that regularly brings us surface level worlds, with no embedded learning within them, was a bit confronting, and really, in my mind, showed that they can talk the talk, but perhaps cannot yet walk the walk. I say this because they still regularly release things at the basest level for all those teachers that are looking for, and need, the low hanging fruit, yet still, after many years of this platform being theirs, they do nothing to support those who are ready to go deeper, or looking for more than allowing creativity from their students in this platform.

So, as a community, what is next, other than waiting for Microsoft or the M:EE team to realise there is a need in the community for more than the low hanging fruit? I think we need keep building a community, I am still trying my best to share everything I learn, how I work, and why I make the decisions I do, and it is pleasing that there is a growing community of those interested in taking things further, beyond the basics. If that sounds like you, join the Discord (https://discord.gg/7fSQBdx) and start chatting to others about your outcomes and plans and see if, as a community, we can create something truly amazing.

Also, don't let my opinions of the Mentor community dissuade you from joining that community either, regardless of your experience in Minecraft in educational spaces, you will get something from that community, and as I have said in the past, the more educators that join that space looking to grow their practice, and willing to be open, share thoughts and honest feelings and collaborate with others, the better off the global Minecraft in education community will be.

That's it from me, I KNOW Minecraft is so much more than a creative platform, and I understand that all community members are on their own journey and need to start in a place of comfort, but some community members have been on a journey longer than M:EE has been around, and there is very little supported growth opportunity for them. Which also means there is little to available to support those beginning who want to go further, and I find that very disheartening. I hold hope that at some stage in the near future Microsoft and the M:EE team will begin to move beyond only supporting the low hanging fruit, and start supporting a wider range of embedded learning in this platform. If you have any comments, feel free to leave them below, thanks for reading.

Wednesday 19 June 2019

Genetics Development - Day 4 - Starting the Genetics

I should say, as this is the last post I am writing in bulk since starting the project, and I hope to do these 'one at a time' from here on, that while I am listing days, sometimes there were multiple days between these 'major days' where thinking happened and some minor testing, but I am trying, at this stage, to do 'goals' for each day I am developing this project.

So on day 4, having gotten absolutely nowhere with the male/female breeding thing, it was time to turn to the genetics side of things and try and wrap my head around that. Boy it was a productive few hours, again a 1am finish, but a happy 1am finish!

So, with the genetics, I had the Panda to refer to, but it turns out it is quite easy to do, I must admit I spent a few hours mapping the traits I wanted a particular way, and I am still only doing a small component of the genetics I want, essentially sex and two varieties of wing type. It took a few hours, but by the end of it, I had flies inheriting traits from parents.

Basically they inherit their sex from one of their parents (normally in it is from the male passing on either an x or y chromosome at a 50/50 ratio, and I think I have that happening already. They also can inherit wing type, and this should be a dominant/recessive pattern of inheritance. Where by if I breed a pure bred wild fly with a vestigial fly all should 'look' wild type, but their genetics should all be heterozygous for wing type.

If I then take 2 of the first generation, and breed them I should get one quarter of the offspring being vestigial and the remaining three quarters looking wild type. I have also started thinking about 'lethal' genes, as that is an important thing to discuss.

At this stage I still don't fully understand what I can, and cannot do in the entity definition, with regards to using tags that I create, I am still using the 'inbuilt' variant and mark_variant tags. Variant is the sex of the fly, and the mark_variant is the skin that overlays that. I have some work to do on the textures, and the models, because I think I may need 3 variables to use in the render controller, which is certainly possible, but I am not ready yet.

I haven't done any solid testing on the current inheritance pattern, probabilities or anything yet. That is actually the plan for day 5, create a few entities, see if I can 'edit their genetics' externally so I know exactly what they are, and breed them multiple times and record lots of data about what happens.

In the intervening days between where I finished on day 4 and am writing this post, I have remembered an experiment I did on these flies at university, that took a whole term to do, because of the life cycles of these flies in the real world, and in theory, if I can get this working. I can replicate that whole experiment, and get the exact same data out of it in Minecraft within about an hour.

So, I am really excited to see how far I can go, how in-depth it can be, and how authentic I can make it. That's it for now, thanks for reading, and if you have any comments feel free to leave them below.

Tuesday 18 June 2019

Genetics Development - Day 3 - Restricting Mates? Nope!

On day 3, I literally achieved nothing new. I ended the day in exactly the same spot as where I started it. I did however do a lot of testing and experimenting and learning. The goal was to try and make it, since I had clearly defined male and female entities, that only viable offspring were produced when a male and female mated. This is a genetics resource after all.

I was trying to use filters in places that apparently do not support them, double and triple checking syntax, trying to figure out what I could do to make it so that only males and females bred together. I tried all kinds of tags, like "self", "other" and "target" in the filters, but to absolutely no avail.

I went to bed at 1am (again) and woke up at 6am with what I thought was the answer.... but nope, sadly I was mistaken. In fact, as of writing these posts, I still have not solved this issue completely, although I have made a little bit more progress on it.

A very short post today, and that is fine, it was many hours, with a lot of no result at the end, but a lot of learning along the way! :D Feel free to leave a comment below.

Thursday 13 June 2019

Genetics Development - Day 2 - Getting it in Minecraft

Day 2 started where day 1 left off. I had packs, I had 4 flies, and now I had to work out how to get the game to render the four different flies. It started with the 4 flies, their models, textures and everything in the right place. I swear it! But no matter how I tried I could not get them to render.

The issue I was having was that the 'render controller' was being 'ignored' by the game. OK, so I had something wrong that meant the mobs would be spawnable, but have no geometry or texture. They did however cast a shadow! Which, given that I usually have issues even getting the spawning to happen was a step up from my normal first attempt at packs.

One thing I noticed was that there was a way of calling multiple geometries, and I had the example from the sheep mob to look at, but is used a 'set' data point, and I still don't know how to add my own 'conditions' to entities and call them out later for use.

So, I also had things like horses, who have multiple textures, but the one geometry, and I spent about 5 more hours trying to figure out how to 'merge' the two magics into one render controller. The really unfortunate thing, is there is zero 'clear' documentation on how anything works. There is plenty of documentation, but nothing that directly applies to me, and I have to try and stitch together breadcrumbs from about 4 different official Minecraft web pages into some form of coherence that both I and Minecraft can make sense of.

The big issue I have is that Minecraft doesn't really throw errors at you. Things just don't work, it ignores them, and continues doing what it does. It wasn't until I started making Minecraft actually crash that I felt that I was making progress.

After about another 4 hours work, I finally got all 4 flies to render in the game, based on different geometries, and textures, that I could 'call' upon when I needed it. Sadly it turns out that I had everything pretty much right at the start, only I was missing one, apparently, very important set of [] in the render controller. Oh well, 3 hours 'wasted' but not really, because I learned a lot!

So, this is where I ended day 2, another late night/early morning and bed at 1am!


Thanks for reading, feel free to leave a comment below.

Wednesday 12 June 2019

Genetics Development - Day 1 - Building the Base Packs

I was going to hold all of these posts until I had finished the genetics project, which will (hopefully) be ready and available for the next EE update. However, after getting to 'Day 6' I decided that I should put these out as I do them, like in the old days.

I am writing these posts as close to the days they relate to as possible, and the first 4 posts were written as a batch on the 30th of May, but instead of mass releasing them and spamming you with them, I will release them every couple of days until I catch up, then it will go back to 'as written' publication timelines. however I will leave them in draft form until I have completed the lesson and resources. So, if you are reading this, then I am DONE! Which, given I am currently about 4 days (around 20 hours) into my creation, I am very pleased about. Now, to business, and first business is background.

In Minecraft 1.8 they added Pandas, but while Pandas are special in their own right, they are also a bit extra special in Minecraft, because they are the only mob to have 'proper' genetics and inheritance. This started the senior biology teacher in me thinking about how I could utilise this to help me teach genetics to students, and how much I tried to do this 'back in the day' with MinecraftEdu, but the sheep just weren't a 'proper' model to support teaching. I ended up going with Pocket Frogs, but that is probably not a super key point, but still a really cool game for teaching inheritance and getting kids to think about the patterns that exist.

Anyway the idea has been stewing since Pandas came to vanilla Bedrock, but the idea took off into full flight mode once I figured out how to add my own entities. Not hijack those already in the game, but add my complete own custom entity. It was possible in 1.8 with 'experimental gameplay' on, but unfortunately they lock us out of using that in Education Edition (despite my requests to at least give us the option to choose ourselves).

So, I learned it because we had plans to include something in the first release of Mini Melbourne, but since experimental gameplay was banned, we had to pull back on our plans a little. The great thing for me, the learning had happened, and I was able to go back to stewing on exactly how I could do what I wanted.

Fast forward a few months, and I get told that the 'Village and Pillage' update for will come to M:EE 'soon'. So I think to myself "I wonder when custom entities got taken out of experimental gameplay." To my absolute delight, research said that 1.10 was the version, and since M:EE was going to be updated to 1.11 at least, I was right to actually implement my nefarious ideas.

So, onto what I did in day 1. If you have never tried to create a resource and behavior pack, do try it, and you will find that there are limited resources out there to help you, or there were when I started, more programs, guides and support are being made available all the time, which is all for the better, but getting started is definitely hard work! It took me about 5 packs to get the whole process stuck in my head, no joke. Day one consisted of the 5th attempt to create a pack, from scratch that would allow me to do what I wanted.

With the basic file structure of the pack created, it was time to go into Blockbench, an absolutely wicked program, that I need to do some tutorials on... add that to the list that is growing steadily longer because time.... is a precious resource, that I have very little of at the moment. What Blockbench allows you to do, is model an entity and export it to use in Minecraft (and many other programs, but my focus was Minecraft). So I spent the first 4 or so hours of this project creating my models, textures and a rough and ready animation and then getting them into the appropriate places in the packs.

4 Drosophila melanogaster models. Wild type male and female, and vestigial male and female flies.


With that all achieved, I went to bed, it was 1am after all. Next post, next day! Feel free to leave a comment below.

Tuesday 11 June 2019

An Update Post About Blog Posts

This, I guess, is a warning post.... I currently have 6 posts sitting in draft format that I need to release, written over the last few weeks, that show the journey of a personal project up until yesterday. I don't know exactly why I was sitting on them, I think part of it was not to 'disrupt' the flow of the Mini Melbourne development posts I have been writing, but it has also been a significantly long time since I shared the development of a project 'live as it happens' on this blog, and well I think this project is pretty amazing, and I am excited to share the journey with you as I continue to develop it. I also think that sharing the journey of learning as I move towards the end product is something that is super relevant, and will hopefully be helpful for others.

Mini Melbourne is amazing, and shows what awesome stuff can be done with a team of people, of wide expertise, and a clear focus on learning outcomes. What I hope to do with this personal project, is, as I get time, create something that shows just how flexible Minecraft can be as a teaching and learning platform from the perspective of one person volunteering time, exploring new game mechanics, researching and learning along the way in completely new territory for the educational aspects of Minecraft.

The Mini Melbourne development posts will continue as I have time to write them, but expect a few other posts between times too. If I can get my act together enough, I might also share some of the parts of this project as I move forward for others to have a mess about with. I need to say, that at this stage, this project is being developed outside of M:EE and in standard Bedrock at the moment, because the features are not available in EE yet. I guess one thing to ask, is do you, as a reader, want access? Would you like to explore what I am creating 'live' as it develops? Hard to answer, without knowing what the project is, I know, but all the background and everything is in the next post, I promise.

That's it for now, I will release these posts 'slowly' rather than all at once, maybe every second day. Feel free to leave a comment below, and as always thanks for reading.

Thursday 30 May 2019

Mini Melbourne Step 2b - Getting the World Final Workflow

Last post we talked about the early attempts, and shortfalls of each attempt. I am not sure I am doing justice to the learning that went on to get to this final workflow, that worked for us, but to put it in some 'time' perspective, it was multiple weeks of data, attempts, research, more attempts, more data, more attempts... well you get the idea.

But, all that aside, here is the final workflow that worked for us and our data. As mentioned in the previous post, all the data was provided to me in .obj files exported from 3dsMax, in a process that I did not have, or want, direct access to.

There is this really neat, really really neat in fact, program called Qubicle, which can import almost any 3D file and 'voxelise' it. Even better if you pay for it, has an export to schematic function built in. This piece of software, shown to me by Adam is a key part in the path. However there are limitations along the way, the biggest being that you cannot take all the data and just mash it into it. The scale for this particular project, is very important, and sectioning the data was definitely a big part of the key that makes this world infinitely expandable. You see, it appears that Qubicle has this 'hard limit' on how many 'blocks' it can effectively scale. For me, it was around 256 on the vertical axes, once you started to scale models beyond that size, things started going awry. The models would be 'pulled apart' in odd ways, and the 'verticality' of the data would get all kinds of messed up, like this:


So, you can see that is a bit of an issue if you are trying to recreate a whole heap of a city. There is no way you could do it using that as a basis. So after a whole heap of messing about, working with those that held the data in 3dsMax, we solidified a size that we would work from, 200 meters squared was the most reliable.

Another interesting thing I found along the way about Qubicle, was that when you import a model, it tries to automatically scale it as big as it can, and the 200m model size, seemed to make Qubicle not mess with the scale on import, which was a huge win, and in hindsight, likely to be because 200 cannot be doubled and still be under 256. This caused us some issues with the tallest building in Melbourne, causing the scale of those sections to be slightly off, so I had to learn how to edit this particular section in Qubicle and export it in 2 vertical parts, and 'tweak' the scale accordingly so it aligned properly with the 1 block = 1 meter of the rest of the map.


Originally we were talking about 100m models, as shown in the image above, but I am glad we were able to push it out to 200m because it cut down the work required to stitch it all together by three quarters. I also, for completeness sake should tell you that I tried to stitch each of these 200m squared models together in Qubicle, but it was just too much for the software to cope with, and started causing me issues in terms of accurately aligning the models.

The time taken to render and move models around as more and more models were added was very problematic, and I am not working on a potato of a computer. On top of that, after persisting with it and getting everything to a point that I thought it was close it turns out it was unable to export such a large model to .schematic, it kept crashing when I tried and those sections I did manage to export were actually not aligned very well at all, despite appearing OK in Qubicle... 3D modelling is all about perspective, and making sure you are checking things from all of possible perspectives.

So enter the final piece of software along the way, MCEdit. To be honest, I have never been a huge fan of MCEdit in the past, not because I don't like the program, or what it was capable of, but more because I was unfamiliar with it, and while it looks like Minecraft, there is a massive difference in the way the controls work, and the way the 'player' (camera) moves and I really struggled with that.

This is why, back in the MinecraftEdu days, I loved WorldEdit so much, it was in game, powerful, and the controls made sense! But boy do I love MCEdit now, I learnt so much about MCEdit 'as required' during this project, which was an awesome way to learn actually, and I am still nowhere near an expert, not like Adrian, nope, nothing like that, but I am now proficient enough to do most of what I need to get done in a timely and what I believe is an efficient manner, or efficient enough for me anyway.

Stitching the pieces together took a lot of practice, and involved aligning each piece, very carefully. There were multiple restarts and throw away worlds along the way, but once I figured out the proper way to nudge parts around when importing, it was actually quite easy to do. It was also way easier to align the different pieces properly in MCEdit than it was in Qubicle, because Minecraft is very explicit with regards to the coordinate system, which means there are significantly less 'misalignment' opportunities.


I did realise early on, that I couldn't always align the edges of the models in a fixed grid type way, as, despite my requests to have everything in 200m square slabs you can see from the map image provided above, that if you combine a 2x2 grid of those squares together, that not all would end up square, nor 200m. So I had to devise a plan regarding finding the corners of each 'square' as it came in so that I could more easily align the pieces, 28 in all. What I ended up doing was 'marking' each corner of the piece after I imported it with a different block so that I could more easily align the adjacent pieces.


See that very faint blue spot in the middle of the gray sea of stone? Yep, that is my marker! Now, as you can clearly see the big downfall of all of this work was that, while all of the data was now in Minecraft, it was all made of stone, and well, didn't look much like Melbourne at all. We did explore texturing the models in Qubicle, as the obj file exports I received had material files associated with them, but we decided 'translating' those materials across into Minecraft blocks just was not worth the time it would take to do properly, when we could texture the buildings in MCEdit for 'broad strokes' and in-game for the finer details.

So that wraps up the 'getting the data into' Minecraft aspect of this series, next up, will either be how I started detailing the world, or heading back to the next stages of development of the Dig Experience, I am not really sure which I will feel more like writing about, since they were concurrent processes at this early stage, but stay tuned, and as always thanks for reading, feel free to drop a comment below.

Wednesday 22 May 2019

Mini Melbourne Step 2a - Getting the World Failed Attempts

Alright, so in the last post we talked about how we started looking at this project from the perspective of the 'Dig Experience' and that the building of the city was a secondary objective. These two 'projects' of course were in 'co-development' as the dig would be 'set' within the Mini Melbourne world. However, once we had nailed the basics of the dig, and determined that it was going to be possible, we looked at what portion of the city we were going to get into Minecraft. We knew we had 3D data of the entire city, but choosing a smaller section and testing out the process for getting that data in was important.

This map shows the initial planned data for import, and a small subset of that was given to me to do all sorts of testing and investigations on. The slab I was testing appears to be from St Paul's Cathedral along Flinders Street (north side) towards the east.


We were not in uncharted territory, and many people have their own unique workflows to bring data, big data, into Minecraft. So, I turned to the community and two of my favourite online Minecraft experts, Adam Clarke and Adrian Brightmore showed me how they get 3D data into Minecraft, in multiple ways. Without those two and their expertise, the project would have been a lot more difficult. So, I thanked them back then, and I am going to do it again right now. Now that the project has been released into the wild I am so pleased with how it turned out, and that we actually managed to get the project over the line.

Without the willingness of both of these amazing guys, I am not sure it would be as big as it currently is, and as easily expandable as I know it is currently. With all the sincerity I can muster, thanks guys, this project started with freely shared community knowledge, and ends with a freely available resource for the entire world to use and explore, create and share across all major Minecraft platforms.

So after my discussions with Adam and Adrian, I went back to the people that had the data, and we talked about what sort of format they had the data in, and what sort of format they could easily get it in. It took us quite a bit of time to nail it down, but in the end we now have a workflow from their data, into my hands, in such a way that I could easily bring it into Minecraft world, that was easily expandable for when we want to include more of the city in future updates.

So, how did we do it? In this post, as the title implies, I will share the explorations I started with, and what issues these workflows caused, and then in the next post we will talk about the actual workflow. All of this data was given to me in .obj format, exported from 3dsMax, the process of which is a 'black box' that I know very little about!

First attempt: TinkerCad; Freely available, and something I have used before, so of course I started here. Interesting how you always start from an area of most comfort! Unfortunately for my comfort levels, I very quickly found that TinkerCad was not all that great at dealing with 'large' or 'detailed' models, fantastic for the smaller stuff I have done in the past, but not a great prospect having to neaten all the holes and everything in the large detailed city models I had access to.


As you can see there are holes in the terrain, entire missing sections of roof and all kinds of things I would have to neaten up in 'post-processing', and given the scale of the data I was using, probably not going to be a great option moving forward in terms of scaling the project in future and ease of use. I also decided at this point, that we were going to have to 're-north' Melbourne before we brought it into Minecraft. As you can see, all the buildings are 'angled' and it just looks 'jagged' for lack of a better word.


This is the same Tinkercad import, only 're-northed' by around 21 degrees. It looks way, way nicer, but you can still see the missing parts are still very prevalent.


Next attempt: VoxtoSchematic; Adrian has a wealth of knowledge about MCEdit and a massive collection of filters for doing all sorts of crazy things with it. He pointed me in this direction: http://www.brightmoore.net/mcedit-filters-1/voxtoschematic so I began exploring. It required me to import the obj data into a voxel program, I used Magicavoxel (https://ephtracy.github.io/) to get started, because... free... and we were only exploring at this stage. This allowed me to 'paint' portions of the data a particular colour and then export for the VoxtoSchematic to work with and VoxtoSchematic would convert those colours to specific Minecraft blocks.

A truly brilliant piece of software by Adrian, and Magicavoxel is pretty darn cool as well, but the scale quickly became problematic, as I had no way to control what 'size' the model was converted to schematic at. EDIT: Found my notes (finally) and Magicavoxel also had a serious limitation on the number of blocks it could deal with, 126 blocks cubed. This was the first point where we were seriously looking at how much data is too much. We really needed to find a balance between software limitations, and also time limitations. As in, we could easily export each building individually, but stitching that much data together at the other end would be way too time intensive to be sustainable. The great thing about this process is that the models imported quite well, neatly, with way less of the fidelity loss we saw in TinkerCad. However, the scale was all over the place and I couldn't easily find a way to manage that effectively.


It was about this point that I understood enough about MCEdit to realise that no matter which path I took, it was going to play a big part in the creation of the final world, so we started to look at converting the 3D data directly to schematic format. I investigated FME, and some neat posts detailing how that could easily translate big data into Minecraft directly, but the path was just not clear enough, and neither me, nor the data company had the software, or the time to learn it to the depth it appeared we would need to complete that workflow, so we continued looking.

That, very quickly, summarises a couple of weeks worth of testing, trialing, researching, testing some more, researching some more and testing even more. In the next post I will share the workflow that worked for us, and our data. As always, thanks for reading, and if you have any comments, please feel free to leave them in the comments section below.

Wednesday 15 May 2019

Mini Melbourne Step 1 - Is it even possible?

This is the first in a series, of unknown length, of posts detailing, I hope, the process I went through, the people that helped, the software we tried, what failed and why, what we software used in the end, the game mechanics and the iterations of these that all came together to create both Mini Melbourne and Archaeology Adventure. If you haven't seen Mini Melbourne, or the Archaeology Adventure... I would ask what rock you have been living under, but that could be rude, so I suggest you check out this promo video showing what it is. (EDIT: Apparently the embed has stopped working, so here is the link: https://fuse.education.vic.gov.au/Resource/ByPin?Pin=8WB7CM&SearchScope=All

Funnily enough, even though the title of this post says Mini Melbourne Step 1, it didn't really start as a project to recreate such a large portion of a city in Minecraft. It started with a question, can we, two completely separate government departments, create a piece of content for Minecraft and make it really, solidly educational and suitable not only to both departments, but also to a wide range of schools, students and subject areas?

The idea for the project, out of the three that were coined in preliminary emails, that held the most interest of the team, but oddly enough my 'least favourite' was the idea of students performing an archaeological dig. If I am being honest, and I like to think I normally am, at the time I thought they were trying to make their ideas fit Minecraft, rather than making Minecraft fit their ideas, but as always, I went into the meeting with an open mind and, well.....

I was totally wrong of course... I had no idea prior to our initial face to face meeting that there were actual archaeological digs happening a block away from me right then, as we were in discussions about this project, and those archaeological digs would be the factual basis of this whole experience. Not only making this a highly immersive experience, but an authentic one, based on real events of real sites and real people and community from our city's history.

So, after our initial meeting, it was decided the first project we would work on would be what would become Archaeology Adventure, or the 'Dig Experience' as it was called for much of its development internally. So I took the idea and started playing around with the mechanics I knew of that might support this kind of thing. I also had to explore some mechanics and make them up as I went, which has been one amazing side effect of working on this project, I have learnt so much, and I hope to share as much of it as I can, by starting at the start and taking you on a journey to the finished product, both through this series of blog posts, but also through a YouTube video series that goes more in depth about each mechanic than I could possibly do here and keep your attention!

Anyway, back on topic! I created a quick and dirty mockup of how I expected a dig might work to show the team. That constituted the following basic mechanics;

A security pass, and check in system to actually get onto the site.


The raw and rough mechanics for randomly 'finding' items in a given area.


A way for students to choose how fast they would dig.


A way to 'uncover' what the found artefact was (analyse it) rather than just 'know' it straight away.


And, finally, a way to provide students with the information about each artefact that could support them in their goal of determining what the site was used for in the past.


Of course much of this, 'mechanically' speaking, has changed considerably over the development period, but the fundamental basis of it all is still there in some way, shape or form. I think the only things that have pretty much remained 'mechanically' the same is the security pass and check in and the analysis of items. But, this 'pre-alpha' demonstration set the scene (or at least the base of the possible scene) for what we could achieve in Minecraft for a room full of people who had never played before and really had no idea about what was possible.

With the 'raw' mechanics at least visible and planned out on a small scale, it was time to look at getting the data for Mini Melbourne itself, and that, my friends, is the topic of the Mini Melbourne Step 2 post. While you are waiting, I am sure with eager anticipation for that 'mouse scroller' (Is that the internet equivalent of a page turner?) to arrive, keep an eye on my YouTube channel for the video outlining each of these first mechanics, the reasoning and commands that make them work, and maybe even why I thought they were a good idea at the time.

As always, thanks for reading, and if you have any comments or questions, please feel free to leave them in the comments below, touch base on Twitter @EduElfie or even join our Discord: https://discord.gg/7fSQBdx.

Tuesday 16 April 2019

Functions are Flipping Fun and Potently Powerful.

Firstly, let me apologise for the title of the post. I was feeling somewhat creative and flippant, and well.. unfortunately this is what happens.

To business, the latest update of Minecraft: Education Edition brings with it massive functionality that we can use to 'smooth the waters' and begin to develop really supportive 'things' for teachers (and students) to use in their classrooms. This functionality, with no pun intended, is actually the /function command.

Just the yesterday I released the first public version of my 'Classroom Management Pack' and while still under active development, it is very, very neat in my humble opinion. It takes all of the suggested 'fixes' for classroom management concerns from community members that I recorded and published in September last year, but it also adds in a freeze all players option as well as a few other new tweaks I learnt along the way. Check out the video here:

None of this would have been this 'easy' without functions being available. Essentially what a function is, in the simplest terms I can think of, is a series of Minecraft commands that are run 'all at once, but in order.' It is super simple to get started with, and I will have a tutorial and supportive documents to help you out in getting started yourself 'soon' but in the mean time, start thinking about all the things you could automate.

I know using these functions took my latest project from 1000+ command blocks down to maybe 300 or so. It also makes editing things much easier, as they are just plain old text documents where if you find a mistake, you don't need to edit it in every command block but 'find and replace' has become my new best friend. I even found a find and replace in all files option in Notepad++ that I used on a few occasions to do bulk changes across the entire map, saving me hours of command block editing, even if I were to do it in MCEdit.

But what I am really excited about, is that I think this functionality could really support teachers in a much more active way than classroom management, and that is in 'building' as ridiculous as that sounds. One of the biggest limitations I have had with M:EE as opposed to the old Java MinecraftEdu is the inability to have 'worldedit' functionality in-game. I much rather being in-game building things as it gives me a much better perspective. However I have been 'resorting' (sounds so bad, but really it isn't) to MCEdit, and while that is also super powerful, and has a place in my workflow for creating worlds, it would be awesome if I didn't have to export out of M:EE every time I wanted to do a simple import of a schematic.

Now I don't think I have the capability to do a complete 'worldedit' pack, but I am going to have a stab at it, but before that I do that, I am going to create a 'build pack' where there are some solid, functional builds ready to import to a world, while in world. This would not be a 'simple' thing to add to, the way I understand it right now, but I remember ages ago, that Shane used to have the same 'start layout' in each and every map he made. This could be a reality again, if you wrote the function to create that build, then you could just have the 'build pack' in each world, and type the command to build that start location almost instantly.

Imagine you could have a function to build the structure, prepare all the scoreboards for one of my complex scoreboard builds (ECAS or ECAAS) to do multiple choice answers in-game, and the teacher only needs to run the 'create' command and then copy/paste the appropriate commands into the appropriate command blocks. This removes, what I believe to be the biggest barrier to using these kinds of things in multiple lessons, and that is using MCEdit to import schematics into a world. Don't get me wrong, it is possible, it is just not something that teachers necessarily have the time, or inclination to learn.

Anyway, exciting times ahead, thanks as always for reading, if you want to follow the progress of the 'build pack' (I will try to update here as often as possible) follow me on Twitter @EduElfie. If you have any comments, or questions please leave them in the comments below, reach out on Twitter or ask in the Mentor Discord: https://discord.gg/7fSQBdx 

Monday 8 April 2019

Playing Games as Opposed to Learning In Games

Back to normal broadcast this post, brain dump time! I have been grinding my brain over something that has been bothering these last couple of weeks, and I think I now have my mind ready to go and put my thoughts into some form of coherence here. The topic is, how is playing games while learning, different to learning while playing games, and which is best for classrooms. I have a summary right at the bottom, for those who are short on time, and don't want to read all the ramblings, but just want the essence of what I came to realise.

Might seem a curly topic, and I really should probably explain why this has come about. Recently I have come across resources that have students playing disconnected mini-games in Minecraft while looking at models, or trying to solve problems. The key point there is that the games are disconnected from the learning, they have no connection at all, and in some cases the game actually gets in the way of learning.

I am not trying to point fingers, or put down somebody's work, however I just cannot see how this is a positive thing to be available for community members to access, and I think it makes it even harder for teachers to get started, or even continue their journey.

So, I want to try and clarify my thinking about this. I am a big proponent of using the game to support teaching, in fact I think that is one of the best uses of Minecraft is to actually use the game mechanics to support the teaching focus or learning outcome. I think another key idea here is that learning can be fun, but having fun doesn't necessarily mean learning is taking place. A lot of people talk about engagement being a key factor in their decision to bring Minecraft into their classroom, and let's not beat around the bush here, it is a game, it is fun, and it is engaging, but none of those should get in the way of a good/better learning outcome for students.

So what is the difference between playing a game, and using the game mechanics to support learning? I am going to be honest, I just spent 20 minutes writing up some examples to try and clearly define my thinking here, and it just muddied it even further, as each time I thought I had a 'game' as opposed to 'mechanic supporting learning' I thought of a way to change the 'game' so it was supporting learning or a specific learning outcome where it would be relevant. So let's discuss fighting of mobs as this is something, in my experience, that some kids regularly request when they first get into Minecraft in a classroom.

I am not talking students in survival and writing a journal of their experiences, as the 'game' is leading to the writing and planning there. I am talking about kids being given 'time' to go and kill mobs in Minecraft, kitting themselves out in whatever gear they want and going out in the night(or day) with the goal of slaying as many bad guys as they can.

When would I use this in my classroom? Well, how about the learning context is probability, and students are tasked with trying to find out the difference between the levels of the looting enchants and what the likelihood of various monster drops are. Or students are collecting data on how many mobs they can kill with different types of sword, and comparing the durability or attack damage of each.

When wouldn't I? As a 'boss battle' at the end of the class or while students are trying to do some learning task within Minecraft. While students are building a model of a solar system, is not a good time to start a battle with mobs in Minecraft.

I think the key idea here, as I sit and write this, is that the game(the fun) doesn't get in the way of learning. It has to be connected to it in some way. That is using the mechanics in the game to support students to achieve a learning outcome. If I cannot clearly outline how the particular activity students are doing supports them in reaching the learning intention for the lesson.. then why am I doing it? This seems so simple, and I am not sure where this has been lost in some of these resources.

Engagement should never be the answer to the "Why am I doing this?" question. "We have done our learning in Minecraft, now lets fight some mobs." with the goal of trying to make sure students have fun is not the way to go in my opinion. It devalues the tool, and will make it more difficult to keep the learning happening without 'the fun' in future lessons. Learning can be fun in Minecraft, you don't have to 'add' fun games on top to try and make students enjoy it.

A well planned and executed lesson in Minecraft is engaging on its own merits. If students are asking to play games, or PvP, then perhaps the lesson is lacking something, but the answer is not to then disconnect from the learning and go do something 'fun.' The answer is to revisit the learning goal, think about how you would normally teach this without Minecraft, and critically reflect on what Minecraft can replace in this lesson, what it can add to, and what it may detract from. You can always stop the lesson, and talk to the kids about how they think Minecraft can help them with their learning if you don't know how it might apply better.

I guess this has all come about, because even though there are these resources out there, which I would be unable to suggest any teachers use, I am also working on a very 'game centric' lesson currently. I am trying to solidify why my 'game' based lesson is OK, while the others I am being critical of are not. I still think it comes down to the play is part of the learning, not disconnected. It is, I guess, a role play, where students take on the role of a particular profession, and do a whole heap of 'underlying' learning while completing the 'game' in Minecraft.

This is massively different to playing (mini)games with no connection to the learning focus or goal if that makes any sense. Well.... I am not sure I have actually achieved my goal of making my thinking clearer. It certainly isn't muddier, and only time will tell if I can clarify my thinking any further.

Here is a summary:There is now a big difference in my mind between playing 'while' learning and playing 'for' learning, and it comes down to whether the play is connected to the learning or disconnected from it.

Thanks as always for reading, and feel free to leave a comment below if you have an opinion you would like to share on this. I think with more thoughts and opinions this can only get clearer and easier to distinguish the 'good' learning while playing from the 'not so good' playing while learning.

Saturday 23 March 2019

Guide: 3D Printing from Minecraft: Education Edition

This post it more of a set of instructions for others to follow if they want to pursue this. Think of it as a guide, not a set of rules, but what I have found works.

There is an inbuilt way of getting 3D data out of Minecraft: Education Edition with structure blocks, and these work great, if the builds are smaller than 32 blocks cubed. This process is quite convoluted (and I don't fully understand it yet) however, because of the size restrictions on the structure block export, I choose to use a different method, and while it unfortunately still requires access to a windows machine to work it does provide unlimited sized exports for 3D printing. I am yet to find a mac/iPad workaround, but I continue to search and will update accordingly, or likely write a whole new guide if I manage to find it!

The first step is to have something built, I am not going to provide any guidelines here, go build something you want to 3D print, or grab a world that a student has built in and use that. Either way, you need to export the world from M:EE. To do this click the 'pencil'  beside the world name BEFORE you enter it. Scroll all the way to the bottom and there is an 'Export World' button.

Export the world somewhere useful, it defaults to documents normally on a Windows machine. Now browse to the exported file and rename it to .zip instead of .mcworld and extract the files. If you cannot see the file extensions, in the 'View' tab of Windows Explorer there is a 'File name extensions' tick box. Tick it, and you should then see the .mcworld file extension and be able to rename it to .zip.


Once you have the files extracted, you are now needing to use the first new piece of software, an external Minecraft map editor called MCEdit. Only you cannot use just any version, you need a special one to open M:EE worlds, and I recommend this particular one here: https://github.com/Podshot/MCEdit-Unified-Preview/releases/tag/MCEdit-Unified-1.6.0.52-testing

While it says it is a 'Preview' release, I have been using it for a while, and it is pretty stable. There is a release after this, 1.6.0.53, but it 'breaks NPCs' in any map opened in it. So I recommend not updating to that version, and sticking with this one. Download the release, unzip the files and run MCEdit.exe and it should look something like this:

Click on 'Open...' and browse to the extracted files from your exported world from before and choose the level.dat and then click open. If you get this error: 


I believe it is linked in some way to the 'Blocks of Grass' template exporting in an 'odd way' and I haven't figured out the fix yet. However, all is not lost, you just need to head back to Minecraft:EE and make a copy of the world, using the 'Copy World' button, and then export that copy instead. That has worked for me most of the time. If that also fails, reach out on Twitter @EduElfie, or join the mentor Discord https://dicord.gg/7fSQBdx and ask in there, and we will see if we can resolve the issue properly.

Hopefully once the world is open, it should look something like this:

OK, so your build might be a little more epic than my terrible, winking flower, but you get what I mean. Right?

Now for a little tutorial on moving around and navigating MCEdit. It is similar but also starkly different than Minecraft controls. WASD Space and Shift, still do similar things, but the mouse behaves completely different. Basically, the way I navigate is to hold down right click on the mouse, and that allows 'free' movement of the camera with the mouse, while moving around with WASD Space and Shift. Take a few minutes to try and have a go, and explore the movement, it is quite a jarring experience when it looks like Minecraft, but doesn't behave as Minecraft should! Once you are comfortable moving around, it is time to start selecting things.

To select something, it is a matter of getting your frame of view somewhere reasonable and left clicking on a block, and then left clicking another block to select a 3D rectangular prism. This was my first selection.

You can see that the entire flower is not within that selection area, and that is fine, we can 'pull' faces out to make sure we have everything selected. Below follows a 'snapshot' of each expansion I chose, and the frame of view I did it from. To expand the selection, hover your mouse over a face until the border of the face goes orange, then 'drag' it the direction you want it to be.

You can see in the image above, that I have moved my camera to be more side on, and pulled the front face out a bit so that it gets the face of the flower, instead of just the dark brown 'petals' of the flower. But you can see I am still missing a part of the 'orange wood' closest to my camera.

From this perspective, I now have everything selected, so time to move my camera (don't accidentally left click, it will undo your selection!). 

Moving my perspective around to the back of the build, you can see that I am missing the back part of the stem, and also the top part of the petals. Time to pull both the back and top faces of my selection so that I cover all of them.

Done! Now to check all sides again, just to make sure it is all within the selection box.

And it is, so now it is time to take this out of Minecraft and into something another program can read easily. Click the 'Copy' button on the left 'menu pane' and it will 'put' this copy in the top right corner of the screen.

You will notice a little 'Save' button up there, click that to save the copy as a .schematic file. Save it somewhere relevant, it defaults to /Documents/MCEdit/Schematics.

Now it is time to install the third, and final piece of software to make this process complete. This program reads Java Minecraft worlds, or .schematic files and can convert them to stl's for 3D printing. Mineways is a gem of a program, and entirely free, download it from here: http://www.realtimerendering.com/erich/minecraft/public/mineways/ 

When I open Mineways I get a whole heap of error codes, I believe this is because it is looking at my Java Minecraft saves, and it cannot open them because they are 'too new' a version of Minecraft. I hit 'OK' on all those errors until I come to this screen.

Now it is time to open our schematic file. Click on 'File' and then 'Open' (not 'Open World'), browse to your schematic that you saved before and press open. Because my build is so small, this is what it looks like on my screen.

Zoom in with the scroll wheel, pan by holding left click and dragging. My build is now centered in my viewing area. I should take the opportunity here to say that you don't have to export the entire schematic in the one stl file. You can get all students to build in the one area in the one world and export that entire area as a schematic, and then choose individual builds at this point for individual printing.

Now you need to select what you want to export for 3D printing. Right click and drag to select, it goes bright pink to show you where your selection is.


At this stage you can choose not to export all the way down or up from your schematic using the sliders at the top of the screen and changing the lower and upper bounds of the selection, but in this case, my schematic is only what I want to print anyway, so I can just press 'File', 'Export for 3D Printing'.

This brings up a 'where' dialogue box, so give your stl file a name, choose where you want to save it and MAKE SURE to change the save as type to a stl variety. 

I use ASCII text STL, but I was told " The other two binary STL file formats should also work, and are much more compact for transferring the data, so you may want to try them out instead." a while ago, but old dogs... new tricks.... you know rigt? You, however, may want to try the three different varieties (or any of the other file types if you want to delve into other uses) and see which works best for you. Once you hit save, a very, very scary window should appear.

While it looks scary, there is not a lot here that you need to mess about with, there are some key settings that you need to know about, but most can be left as they are. The three things to pay closest attention to are the 'Scale' in the top right corner of the window, The 'Delete floating objects' tick box in the middle of the right column, and the 'Weld all shared edges' tick box on the very right side of the window, again roughly in the middle.

Scale, you have a couple of options, you can either make the whole model a particular height, or make each block a particular physical dimension. Either works, and it is entirely at your discretion which you choose.

"Delete floating objects" - On export you'll be warned if there are "floating bits" such as disconnected tree leaves cut off by the volume selected. On by default, this option will get rid of these floating bits in the volume you're exporting. Turn it off if you're sure you want to export everything in your selection volume.

"Weld all shared edges" - Mineways will automatically add a block here and there if it sees parts that would be disconnected otherwise. However, by default it adds as few blocks as needed. Turning this option on ensures that all blocks that touch at only their edges will have additional blocks added to keep these blocks glued together. This makes the model stronger, but can change its look.

Once you have your setting correct hit that 'OK' button to save your stl file and then open that stl file in your 3D printing software. Hit print and enjoy your work!

That pretty much sums up all the steps. If you would rather see me blunder through this in a video, there is a tutorial video available here that steps through it all, however I need to update the links in the video description, as I haven't done that as of posting this guide: 

I hope you found this useful, if you need any more support, or anything doesn't make sense, please let me know in the comments below, via Twitter @EduElfie or on the mentor Discord https://dicord.gg/7fSQBdx Thanks for reading, and happy printing!!